Quantcast
Jump to content


Recommended Posts

Posted

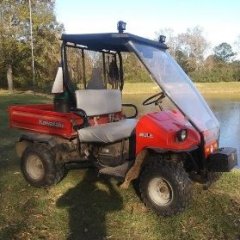
Twenty four bucks for six inches of fuel line! It doesn't sound like it's even high pressure line. But it's still likely cheaper than driving to Houston to find it cheaper. You've got to wait on the key anyway, so if that's all that stands in the way, then I'd say you got off light. Typically on a rebuild, I'll make several trips to the local parts house for those odd bits.

Posted

I found the key, it was in a parts bin where i put some of the hardware for it. 😐

Plus, driving to houston anymore you're risking your life!

One question,  do torque wrenches torque in reverse?   left handed threads on the drive pulleys bolts.

Posted
4 minutes ago, Travis said:

I found the key, it was in a parts bin where i put some of the hardware for it. 😐

Plus, driving to houston anymore you're risking your life!

One question,  do torque wrenches torque in reverse?   left handed threads on the drive pulleys bolts.

Glad you found the key! Maybe there's an old school parts house, or tractor parts supply, or even big rig parts nearby. Some of these places will have a diverse collection of hoses. Might have to go to several. I recently ran across this same thing looking for a metric hose. Out in the country, my money would be on the local tractor dealership. Call and ask if they sell metric fuel line by the foot. That's where I got mine, and it was about a foot. Cost me twelve bucks iirc.

There's several kinds of torque wrenches, so I can't say all will set the torque in reverse. But I'd say that any I'm aware of are made to torque left hand thread also. 

Posted

Pulley bolts torqued, belt cover installed, and shocks installed.

the carb has a small gas leak, I tightened the bowl but and I think it stopped it.

And I called several parts stores around here  and all they have cost the same as the piece I can order.


Posted

I fired it up after i got the belt cover on and all, to be sure nothing was rubbing on anything etc. I'm  really pleased, It fires right up, just a quick turn of the key.

 It used to spin over for 3 or 4 seconds before it started.  :D  

Posted

I', thinking of replacing the headlights, as they aren't very good for night driving anymore, and Christmas is coming up :D  

https://www.amazon.com/Light-Northpole-Flood-Lights-Driving/dp/B01EJWB62U/ref=sr_1_12_sspa?ie=UTF8&qid=1544845742&sr=8-12-spons&keywords=police+spotlight&psc=1

im thinking about these. Do you think  my battery would still work good with these? I think it said they draw 9 watts each.

Posted
8 hours ago, Travis said:

I', thinking of replacing the headlights, as they aren't very good for night driving anymore, and Christmas is coming up   

https://www.amazon.com/Light-Northpole-Flood-Lights-Driving/dp/B01EJWB62U/ref=sr_1_12_sspa?ie=UTF8&qid=1544845742&sr=8-12-spons&keywords=police+spotlight&psc=1

im thinking about these. Do you think  my battery would still work good with these? I think it said they draw 9 watts each.

Looks like the ones that you linked to, draw 3w per bulb ×6 =18w per light. That might be a stretch for your mule's electrical output. If you didn't use the lights for very long, maybe ten minutes or so at a time, while the engine is running. Just like you have to do, when you're using a winch, you might be okay. You'd definitely need to always use a battery maintainer type charger, when it's parked, to make sure the battery doesn't get too low. This is all based on two assumptions; that your mule doesn't have an alternator, and that you'd have these lights on a separate switch, with only occasional use. If they replace the existing headlights, you'd need to know how much power you're saving there. But I'll bet those old lights use plenty of watts.

Posted

The only soldering iron i got takes forever to heat up and barely gets hot enough to melt the solder.... Guess it's time for a new one.....

I got Brakes now!  bled all the breaks and filled 'er up with brake fluid.

Posted

Here are my two helpers, Sally  (tan) Chief (black)

 They're real good dogs and good listeners.  I think they have 2 different daddies,  The tan one is mixed with Pitbull and some kind of bird dog, and the black one is Pitbull mixed with assuming, a  rotweiller or doberman.

DSC_8836.JPG

Posted

Well, i have a electrical problem now, whenever I turn the headlights on, and press the brake pedal the brake light doesn't come on, but when the lights are off it comes on..... Not a serious problem, I can live with it.

Posted

I'd try to back off the bleeder screw just a bit. Then try to gently pry my way in. If you can expose the brake shoes, you could possibly collapse the shoes. Of course this plan is dependent on it being the main brake, and not the emergency brake, being what's locked up. So I suppose that's the first order of business. We're gonna need more information. But I have to say, that plug is typically just a cover for the adjustment.

Posted

I took the plug off, depressed the spring and VOILA !

So I fired it up and drive it up the driveway an back! I need to re adjust the governed and idle speed, although the governed right now is at how fast I usually drive it.

how long should I run the break in oil???

Posted

Glad to hear you got the brake going again without much drama. As far as the break in oil, I'd just wait till it started to get a light brown. But that's pretty much when I try to change oil. Break in, or otherwise, doesn't matter to me.

Posted

For some reason at idle it knocks, but the knock is coming from the belt case, it could be cause I put a new belt on it, and I know the the pulleys are known for making noise as they age, not sure why though. Never made the noise until i put the belt on it.

It sounds far different from a rod knock.

Posted

Yes.

I took the cover off and fired it up, if you know how a centrifugal  clutch works, that what the pulleys is, you have one piece that moves out from underneath the metal housing and whenever it's at idle, it's rubbing against the housing, and when I gas it it moves from underneath the housing and stops, I also noticed the movement of it is rough and catchy not smooth like it should be.

IMG_20181228_174825_hdr.jpg

Posted

The cheapest USED one i found was $250 on ebay. I found a guy selling a rebuild kit for it for $60. but that was for the transmission driven pulley.

Brand new oem is $390, thats almost what i have in the engine! lol.

 This diagram is a little confusing for me as to which parts go on what.... of course once i take it apart i can find out.... but looking at the parts i THINK  i'll need. I'll just wait until it blows up and replace it...

https://www.kawasakipartshouse.com/oemparts/a/kaw/500b2773f8700223e4791d4c/drive-converter

Posted

There's not much to most centrifugal clutches. I believe it's pretty straightforward. Of course I've only seen the little ones, so yours could be more involved. But usually on something like this, the real difficulty is in fighting the new springs back on. Since they're new, and stiff, it can be a real problem. Sometimes there's special tools, and/or techniques that'll help. But it sounds like the kit is the way to go. Might end up being easy.

  • Like 1
Posted

Well, after doing some head and rear scratching and putting the pencil to it. I think im just going to put it back on and role with it. That rebuild kit i found is for the DRIVEN pulley on the transmission input shaft.

 And the parts total to rebuild the clutch nears $200, and a brand new one is $386 from Kawasaki........... thats almost more than i have in the engine!
 

Create an account or sign in to comment

You need to be a member in order to leave a comment

Create an account

Sign up for a new account in our community. It's easy!

Register a new account

Sign in

Already have an account? Sign in here.

Sign In Now
  • Similar Topics

    • By Jacob E freeman
      I have a 2018 cub cadet challenger 750 I bought brand new almost 2 years ago the first month I had it the exhaust broke and burnt the spark plug wire in two that was a recall so the dealership installed the new one it had a different design and it bolted up to the bottom two plugs below the spark plug the dealership said they had to Adjust the exhaust valves I get the machine back thanking everything is good now wrong not even a week after I get it back the timing chain tensioner comes apart inside the motor I take it back to the dealership They put one on I get the machine back thanking everything is good but then just like before not even a week goes by when I was riding the Machine automatically quits going come to find out the wet clutch was burned up the primary clutch head stripped off of the splines I get that fixed and then  it overheats I take it back they bleed the air out of the coolant they bring it back to me the same day that I get it back it overheats again I take it back they temporarily fix it again just enough to let the warranty run out and now the machine has been to multiple different mechanics I have had them try to bleed the air out they have stood it up on its end I have had the water pump changed I have had the fan hooked to a switch so I could leave it on all the time but still almost 2 years later not even 200 hours on the machine and I cannot ride it The dealership will not take it back as a lemon I have tried I am at my wits end I have no clue what to try next
    • By Greg Kilgore
      Last year bought a small universal coolant style cab heater. Well I installed it today. Thanks to another member, RangeRider45, and his install
       
      That told in his post the size fitting he used. I got the same fittings plus a few others. And all went kinda smooth. Took a few minutes to get air purged from coolant system. Should have parked on hill with front up in the air. But would have had a hard time working on it.
      I had a variable power switch connected to an overhead cab fan. Never really used the fan that much. And I have to remove the fan to put on my cab enclosure anyway. So I repurposed the switch to supply power for the heater. The heater has 2 12-volt DC computer fans that are rated for 1.8 amps each. So it's not going to be a big drain on the weak charging system. And with the switch I've got great control over the speed of the fans.
      If anyone is interested the radiator hoses are 7/8 inch. I reworked the temperature sending unit (moved it closer to radiator) to make room for all the extra plumbing I did to get the heater to work the way I wanted. 
      Plumbing parts list.
      10-15 worm water clamps. 3/4 to 1 1/4 inch size.
      2 1" x 3/4" x 1" PEX Tee
      1 3/4" PEX ball valve
      1 1" PEX ball valve
      5/8" heater hose. I got 6' and probably have 4' left over.
      I used the radiator house I cut out to use as splices between the PEX fittings. The PEX fittings are not true to their dimensions that are stated on the package. So they fit the 5/8" and 7/8" very nicely.
      They way I have it plumbed is from radiation out side. A tee, then the 1" ball valve, then a Tee. Coming off the Tees are the hoses going to the heater core. There is a 3/4" ball valve on one of the Tees. The ball valves are used to bypass the heater core in the summer. Or direct the hot coolant through the heater core in winter. The temperature sending unit tells me how hot the coolant is. And if anything is getting too hot. The dash also has an idiot light that comes on if the head gets too hot. But doesn't do anything if the radiator gets too hot. There is a temp sensor on the radiator that controls the electrical fan. But if the coolant isn't circulating. That switch never sends a signal to turn on the fan. But enough talking/rambling. Everyone wants to see pics. The only thing I need to change is the orientation of the handle on the 1" ball valve. I have 2" or more clearance between the handle and the tire when cut hard right. But I still don't like it. And instead of taking the valve out and rotating 180°. I'm just going to take the nut off and rotate the handle 180°. Think I need to make a locking mechanism to lock the handles in place so they don't vibrate closed when the machine is moving.
      The temperature sending unit and housing. Size 22 mm. Aluminum from Amazon.

      Upper Tee the lower Tee is identical. Can also see the handle of the 3/4" ball valve on the 5/8" hose going to the heater.

      The 1" ball valve. Goes between the 2 Tees

      Wide view of the plumbing.

      The heater installed in the sxs. The 3 black hoses are just hanging there. Zip ties to the heater but not attached to any thing. Will probably just direct 2 toward the wife's feet. And 1 toward mine. Or what ever is need as the heat is needed on rides. The black hose in passenger floorboard is some 1" hose that is not needed. Don't know what I'll do with it.

       
      I think if I was going to do it again. I'd put some Indian Head gasket dressing or silicone on the 1" side of the PEX fittings. And I may still do that. But I really hate the ideal of introducing air back in the coolant system.
       
      Any questions just ask. It may take a while to answer. But I'll try.
      Ya be good and stay warm over the next few months 
       
      Kilgore.
    • By TPlummer
      We recently purchased the Axis x550. Fueled it with 93 fuel and drove one time around the farm and the 02 fault error appeared. Any ideas? 
    • By owencole15
      Massimo 500 will only crank when I jump solenoid with screwdriver cranks right up and runs great. But won’t start with key doesn’t do anything when I turn the key. Only thing it does is power everything as in dash and fuel pump then have to jump solenoid to crank up and drive. 
    • eManualonline.com Save 30% OFF Sitewide, Use code: XMAS30
    • By Hugh
      My 2018 Hisun sector crew engine cut off after about 15 minutes run. There is no indicator of what is wrong, no error code just die and won't restart until it cool down. I notice that the fan is not running but the temp indicator is on low temp, no overheat indicator. I checked the radiator fluid, it is cool to touch.
      Cooling fans are working, I can hear it running once awhile if I can get the engine warm up enough.  Thank you for all the help.
       
      Hugh
×
×
  • Create New...