Quantcast
Jump to content


Recommended Posts

Posted

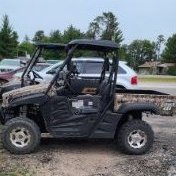
I have a 2013 Coleman ut500. When riding I get a lot of heat coming from behind the seats. Has anyone put some kind of heat shield to stop this heat? It get quite warm on long rides! T.I.A.

  • Alex changed the title to 2013 Coleman ut500 Heat coming from the rear
Posted

Plan on doing something like that to my axis. Something else I plan on doing is a pair of 12 volt radiator fans way up high tied to the ROPS (roll over protection system). Then have passenger and driver rocker switches. 

Should provide plenty of air. Plenty of air comes in at the top of windshield. And help keep dust out of cab. I have a rear windshield. That helps a LOT but still gets a little in. 


Posted

There are self adhesive rubber sheets with foil backing that are heat resistant and will help reflect the radiated heat you could try. As a bonus they also deaden noise. They are available for example, on Amazon, for relatively cheap.

I'm not familiar with that particular model/year but presumably like the other older models the cylinder slants forward under the driver's seat? If so it will be harder to deal with the heat due to the proximity of the cylinder. All the newer engines the cylinder slants backwards and is under the bed.

You also need to be careful what you block off for airflow around the engine because there are parts that require airflow to keep cool even on a nominally water cooled engine.

Posted

I had that same issue with my Massimo MSU500 .. Tried shielding the cab.. heat was still coming in everywhere . it was very hot with our  100* days here. The heat was coming from the outlet of the mechanical fan on passenger side. The duct exited right between the seats rear. And it was very hot!  Turned out it was because  the engine  was running 240* and soon blew the head .. after getting it all repaired couple times, we bypassed the factory sender on radiator and ran electric cooling fan 100%.. guess what, no heat in the cab .. When winter came we installed an adjustable controller to keep the engine between 160*-180*..   All is well now and you can put your hand on that duct on a hot day. 

Posted
2 hours ago, Joe Breaux said:

I had that same issue with my Massimo MSU500 .. Tried shielding the cab.. heat was still coming in everywhere . it was very hot with our  100* days here. The heat was coming from the outlet of the mechanical fan on passenger side. The duct exited right between the seats rear. And it was very hot!  Turned out it was because  the engine  was running 240* and soon blew the head .. after getting it all repaired couple times, we bypassed the factory sender on radiator and ran electric cooling fan 100%.. guess what, no heat in the cab .. When winter came we installed an adjustable controller to keep the engine between 160*-180*..   All is well now and you can put your hand on that duct on a hot day. 

Thanks, but on mine you can see the exhaust right between the seats and the console. I believe that's where all the heat is coming from.

Posted

thats were my exhaust pipe is too.. right next to the duct that flows the heat out of the engine s mechanical fan ..it pulls air from filter box , thru rt side of engine cover and out thru duct between seats.  Its not hot anymore. the exhaust pipe is but the heat is not in the cab now .......... good luck 

  • 3 weeks later...
Posted
On 7/16/2022 at 8:23 AM, Joe Breaux said:

I had that same issue with my Massimo MSU500 .. Tried shielding the cab.. heat was still coming in everywhere . it was very hot with our  100* days here. The heat was coming from the outlet of the mechanical fan on passenger side. The duct exited right between the seats rear. And it was very hot!  Turned out it was because  the engine  was running 240* and soon blew the head .. after getting it all repaired couple times, we bypassed the factory sender on radiator and ran electric cooling fan 100%.. guess what, no heat in the cab .. When winter came we installed an adjustable controller to keep the engine between 160*-180*..   All is well now and you can put your hand on that duct on a hot day. 

Do you have pictures on what you did?

Posted

I did not take pics, sorry..  but its pretty easy to do. Sender is on Passenger side of radiator, just unplug it , jump it for 100% or connect plug to seperate  fan controller .. Hope that helps 

  • Like 1
  • 1 month later...
Posted

We just purchased a Massimo T-Boss 550 and on our first 5 mile ride after getting home it was so hot inside the cab it felt like it was going to burn us! Only way to ride was to keep the windshield up all the way. Should I take it back to the dealer?

Create an account or sign in to comment

You need to be a member in order to leave a comment

Create an account

Sign up for a new account in our community. It's easy!

Register a new account

Sign in

Already have an account? Sign in here.

Sign In Now
  • Similar Topics

    • By Alien10
      I'm thinking of buying a snow blade for my Coleman Outfitter 550 (Hisun with Coleman stickers).
      Has anyone purchased a snow blade that can offer the make and model they bought and any comments, pros  cons etc.?
      Not 100% sure I'm going to buy, as the selection of blades for this model seems a bit thin on line. 
      Thoughts and comments welcomed.
      Thanks in advance.
    • By Homeowner A
      Have a bed decal that has never been right.  Contacted Coleman Powersports and they have no solution.  Anyone know of a place where I could get a replacement decal or complete decal or graphics kit?  
    • By Rainman
      I want to put a charger/maintainer for my Coleman UT400 for the winter and need to know if it uses a 6v or 12v battery.
      One search online showed a 6v, but another stated 12v..
      I can look at the battery, but after taking the seat out you cannot see the top of the battery without also removing the top plate under the seat and at 8 degrees outside, I'd rather not be out there too long.
      Can anyone verify what volt (6 or 12) the batter is?
      Thanks in advance ...
    • By Homeowner A
      Is there a diagram of all of the grease zerks for a Coleman UT 400?  Mine squeaks like crazy and want to try and remedy it.  
    • Get More For Your Device
    • By Alien10
      This is the E Brake, the one that is on the center drive shaft rotor below the dump bed. It is NOT related to any of the wheel disc brakes. 
      A few months after purchasing my Coleman Outfitter 550 (Hisun) new,  the E brake stopped working.  Thought it had got water or oil on it as it gradually went from good holding to poor holding to literally NO holding.  Been lazy using a piece of 4x4 to keep from rolling, but that's a pain.   So, into the barn I went with work light to see what the heck is wrong. E brake pedal worked, but hit a hard stop and  felt like the cable was froze up from rust but that was not the case.  As it turns out the E brake is actuated by some kind of weird actuator lever/cam arrangement based upon the actuator lever being moved about 15 degrees from its fully released position. That makes the adjustment pretty critical with such little movement.  Bolt "C" in the pic below is the adjustment bolt, held in place by lock nut "B".  Working from below, here is what I did.
      Removed the skid plate below the E brake.   6 bolts and washers.  Next, looked at the brake pads which still had a good amount of pad left on them. Looked to be a little less than 1/8" each.  Verified that the cable from the E brake pedal "A" actuated the E brake arm "D".  Cable "A" pulls and released lever "D" in the direction of the curved arrow.  Applied E brake and checked the actuator arm, it was all the way up with no bare cable "A" showing.  Released E brake and checked the actuator arm, it was all the way down with bare cable "A" showing as in the pic below. That spring pulls the lever to fully released position. Note: I disconnected the release spring from at the lever with needle nosed pliers to make working with the adjustment easier to do without that pressure on the lever.  With E brake released, loosened lock nut "B" and backed it off the lever about 1/8" or so.  Tightened adjustment bolt "C" by hand just until it stopped.  Retightened lock nut "B".   E brake now holds securely on my hillside driveway, and releases completely.  Reinstalled skid plate.  Hope this might be of some help to someone as none of this is in the owner's manual or in diagrams. 
       up.
      Released brake and rechecked the actuator arm, it was all the way down.
       
       
×
×
  • Create New...